Stringing Instructions
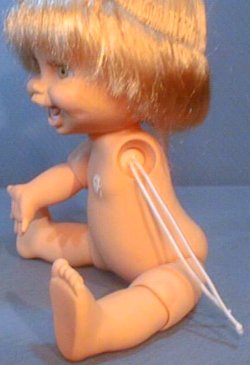
The Galoob Baby Face dolls are strung dolls. They have a very unique system of plugs and cords. Each limb (and the head) is strung separately. SUPPLIES NEEDED
The picture shows a stringing kit designed especially for Baby Face dolls. The kit in the photo includes the following supplies (enough to completely restring approx. 3 Baby Face dolls) :
In addition, you might need:
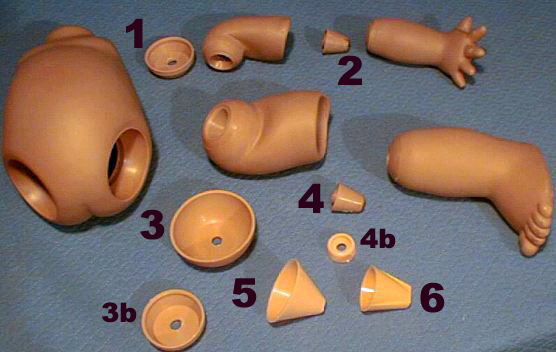
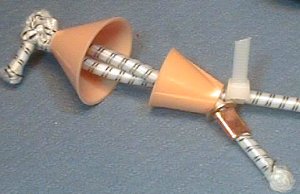
UNSTRING THE DOLL This is the easy part! To unstring the doll's limbs, pull the arm or leg out so you can see the cord, and cut the white cord using a good pair of scissors. Remove the head in the same way. Pull it apart and clip the cord. You only need to remove the parts that require restringing. If one arm is loose and floppy, then just remove that arm, and leave the other one as it is. And, the same rule for the legs. However, if you need to tighten up the neck string, then you will need to remove one arm in order to do the head. You do not necessarily need to remove the head in order to tighten the cords. So read through this entire page before you do anything... you might save yourself some unnecessary grief. :) REMOVING PLUGS AND CUPS The doll has plugs, cups and cones inside. Here is a photo of black Natalie in pieces:
Ordinarily a Baby Face doll does not need to be completely restrung, but this is what you will see if you take her apart completely. Make sure to look carefully at the parts as you remove them so you don’t get confused about what goes where. You may even want to put some of the pieces in baggies so they don’t get separated from one another. (For example, put all the arm pieces for each arm in separate baggies until you are ready to string them.) TIGHTEN THE HEAD If the head of the doll is loose, you will want to try this first. To tighten the head is easier than removing it and starting over. Take off one arm. Test them both and see if one is loose. Why should you do the good arm? Take off the one that's loose instead. Once the arm is off, bend a cable tie in half and put the end in the connector to hold it but do not pull tight. Put the folded part of the cable tie in the armhole and slide the loop underneath the ends of the two neck cords. Use the hemostats to pull on the two neck cords and pull them tight. Then slide the cable tie in the gap above the crimps on the cord ends. The washers get in the way but after maneuvering around them you can get the cable tie around the two cords. Pull the cable tie tight. One cable tie might be good enough, but it is better to slide another cable tie ABOVE the first one. Now the doll's head should be good and tight. If not, proceed to the next step. RESTRING THE HEAD 1. Cut the neck cord so the head comes off. Do Not remove the cone from inside the head. It is very difficult to remove that cone, so do not try because it’s not necessary to remove it. Remove the old pieces of cord and throw them away. Use the hemastats as necessary to grab the pieces and pull them out. In fact, use the hemastats whenever you need to go "fishing" or need to grab something or need to pull on something. If you need to pull HARD on something, then the needle-nose pliers might be useful too. 2. Use the smaller size hemastats and reach inside the head to grab the cone shaped piece. Hold it in place with the wide end of the cone near the neck opening.
4. NOTE: the holes in the narrow end of the head cone and the neck cone might not be wide enough for double cord. If this is the case, I push the hemastats through the hole and twist it around. This does widen the hole a little bit without damaging the cone. Push the piece of string through the cone shaped plug. Grab the cord on the other side using the hemastats and turn the cone so you can manuever. Use the string to pull your double cord through the narrow end of the cone.
5. Once it's through, cut the cord and tie a nice big knot. This will hold your 1/8" full cord. (The cone is inside the head this whole time. The photo illustration does not show the head, of course.)
6. Turn the cone again so the wide end is nestled around the neck opening. The two ends of the cord will be hanging from the neck.
7. Push the stringing cords through the neck hole on the body. Pull them out through an armhole. Slide the neck cone in place. The narrow end of the cone will be down, the wide end will fit up inside the neck. Slide a washer on one of the cords and one of the copper crimpers next. Slide the two metal pieces all the way up the cord to the cone in the neck.
8. This is where you will need a helper!! Ask
your helper to hold the doll and pull on the
stringing cord as hard as they can. While
they are pulling on the cord, then you can
slide the copper crimper piece all the way up
to the cone, tight. Then use a regular pliers
to squeeze the copper tube flat and tight.
Squeeze hard enough to flatten it good. This
will secure the tension on the neck cord.
9. Then slide another copper crimper up the second cord (washer is optional, it seems to get in the way) and pull on the second cord as hard as you can and crimp it tight up by the neck cone. NOTE: Instead of a copper crimper you can also use a cable tie to secure the second cord. See photo. 10. If it seems that there is still not enough tension on the neck cords, then you can take up some of the slack by pulling tight on one of the cords and fitting another cable tie above the copper crimper. Pull the cable tie tight and trim it. This will add more tension to the cord. 11. Trim off the excess cord. In order to save on cord, I sometimes work with the entire piece (a couple of yards) and only cut it when I'm finished attaching the head to the doll body. STRING THE FIRST ARM This method is used when both arms are removed from the body. Use this method to replace the first arm. The second arm must be done differently. 1. Pull the plug out of the lower arm using the hemostats. To do this, trim the cord as close as possible and push it through the other end of the plug using a crochet hook or the hemostats or something similar to push the cord into the hand. Then turn the plug (inside the arm piece) so the narrow end comes out first. Sometimes it's very difficult to turn the plug around. Sometimes a strong piece of string threaded through the middle helps to turn it. I use the hemostats to grab the other end of the string and pull it out. Then, the string helps me to turn the plug around. (Some arm pieces have more room inside than others.) You will want to grip as much of the plastic plug as possible and hold on tight with the hemastats clamped. This does require some strength and some pulling but it’s not too bad. You can dip the lower arm piece in hot or even boiling water to soften up the vinyl and this will make it easier to turn the plug and remove it. (Some people use a hair dryer to warm the vinyl because they don't want to get water inside the pieces. I wait for the pieces to dry out.) After the plug is removed, pull out the old pieces of cord that are inside the hand and throw them away. 2. Cut a piece of 1/8 full cord, approximately 8 or 9 inches long or more depending on how much extra you want to work with. Tie a knot in one end of 1/8” full cord and thread the cone shaped plug onto the cord with the narrow end against the knot. Force the plug back into the lower arm, with the knot going in first and then the narrow end of the plug. Sometimes it helps to lean on a countertop when forcing the plug in. 3. Next, thread the upper arm on the cord and push the cord through the armhole and the shoulder cup, working from the other armhole on the other side. 4. Pull the cord very tight but not so tight that the arm gets twisted from tension. You can tie a knot against the shoulder cup to hold the arm in place, or use a washer and the copper crimper piece. (I recommend using the copper crimper piece for better, easier results. It’s easier to control the amount of tension using the copper crimping piece, too.) --Thread the washer onto the cord first so it's up against the plug and put the copper crimper piece on next. Then pull the cord snug and use a pliers to crimp the copper onto the cord. Squeeze tight. You may also want to tie a knot in the cord below the copper crimper. This will really ensure that nothing slips. Some people also apply some glue to the knot so it will never come undone. STRING THE SECOND ARM 1. Second arm… this is more tricky than doing the first arm. First, remove the plug from the lower arm using the hemastats and throw away the old pieces of cord (as described above.)
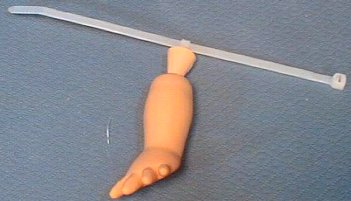
3. Ordinarily the cable tie connector will be too big to slide through the hole in the plug but if you have any doubts, you can slide a washer on the 1st cable tie where the connector is, to prevent the “knot” or connector from sliding through the hole of the plug.
4. Push the plug into the lower arm, narrow end first. Don’t take the piece of string out of the loop or you will push the cable tie loop inside too, and lose it. Try not to push against the cable tie loop, because back-pressure can cause the cable tie lock to open up and fall apart - you will lose your loop. I use a pair of pliers to apply pressure to the plug around the loop but not on the loop. 5. NEXT... Prepare the shoulder cup. Remove the shoulder cup from the body using the hemastats. This is not too bad if you pull it out at an angle using firm steady pressure.
Push the shoulder cup back inside the body and position it with the cord hanging out the armhole. 6. Thread the two ends of the 1/8 scant cord through the upper arm piece and let them hang out at the elbow. Thread one of the ends through the loop in the plug in the lower arm piece. Then tie the two ends of the cord together, pulling it tight so the entire arm fits together snug. Tie a knot several times and trim off the excess length. Push the knot inside the elbow. The tension and stretch to the arm is usually about right. If the arm is too tight or too loose, you will need to cut the cord and repeat steps 5 and 6 again, trying to get it tighter the second time. STRING THE FIRST LEG You will string the legs the same way as the arms. However, it is important to do the leg with the small hip opening FIRST so that you will have more room to manuever when you do the second leg. STRING THE SECOND LEG Follow instructions for restringing the second arm. RESTRINGING - ALTERNATIVE METHODS I prefer to remove and restring the plugs, but Lynelle has devised a method where you don't need to remove the plugs from the lower limbs. Lynelle's method for restringing the arm: Lynelle's Link
Copyright (c) 2002, 2003 Cynthia Stevens All rights Reserved |


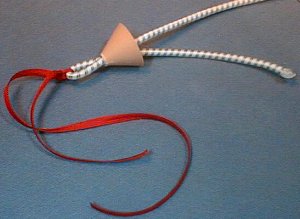 3. Cut a piece of the 1/8” full stringing cord.
This is the heavy cord. It should be
approximately 10 to 12 inches long. You can
attach the head using a single length of this
cord, or a double length. The head will be
much more sturdy if you use a double piece,
so I fold the length of cord in half and tie a
piece of string at the center (in the photo I
used red cord.)
3. Cut a piece of the 1/8” full stringing cord.
This is the heavy cord. It should be
approximately 10 to 12 inches long. You can
attach the head using a single length of this
cord, or a double length. The head will be
much more sturdy if you use a double piece,
so I fold the length of cord in half and tie a
piece of string at the center (in the photo I
used red cord.) 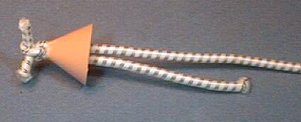

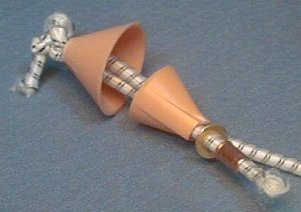
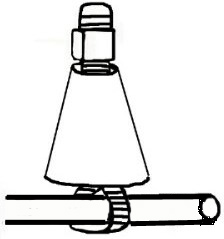 2. You will need one of the cable ties. Thread the cable
tie through the narrow end of the small cone plug first
then thread it back through the same plug so a small
loop is below the wide end of the plug (diagram at left).
Push a piece of string or a scrap of elastic cord through
the loop in the cable tie. (It will hold the loop in place for
the time being.) Join the 1st cable tie connector
together below the narrow end of the plug, then pull it
snug (but not too tight) and trim off the extra length on
the 1st cable tie.
2. You will need one of the cable ties. Thread the cable
tie through the narrow end of the small cone plug first
then thread it back through the same plug so a small
loop is below the wide end of the plug (diagram at left).
Push a piece of string or a scrap of elastic cord through
the loop in the cable tie. (It will hold the loop in place for
the time being.) Join the 1st cable tie connector
together below the narrow end of the plug, then pull it
snug (but not too tight) and trim off the extra length on
the 1st cable tie. 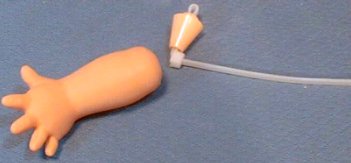
 Cut a piece of 1/8 scant stringing cord that is 8 or 9
inches long and thread it through the hole in the
center of the shoulder cup. Then put a pony bead on
the cord and tie a knot, or just tie a big knot (the
pony bead helps to makes a bigger knot.) Then
thread the cord back through the center hold again.
The knot will be on the outside of the cup, and two
lengths of cord will be inside the cup.
Cut a piece of 1/8 scant stringing cord that is 8 or 9
inches long and thread it through the hole in the
center of the shoulder cup. Then put a pony bead on
the cord and tie a knot, or just tie a big knot (the
pony bead helps to makes a bigger knot.) Then
thread the cord back through the center hold again.
The knot will be on the outside of the cup, and two
lengths of cord will be inside the cup.

