Pattern Instructions
for PrillyCharmin's Doll Bodies
Up-to-date versions of the pattern instructions will be maintained online, here.
Please note copyright information and restrictions at the bottom of this page.

PrillyCharmin’s Doll Body Patterns for Berenguer Dolls
PATTERNS J
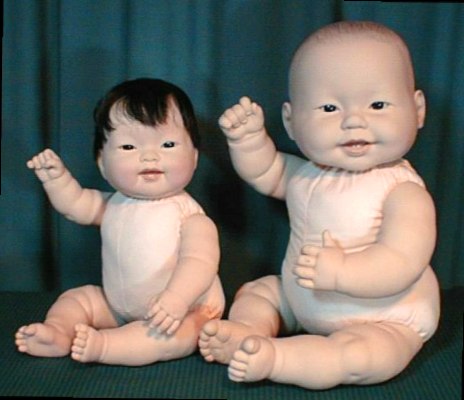
20" and 16" LaBaby Jointed Cloth Doll Bodies
BODY ASSEMBLY

These two doll bodies have cloth arms and legs which are attached to the body with
plastic doll joints inside the cloth pieces. Legs are bent slightly, arms are curved.
The rump is gathered. The bodies may be stuffed firm with polyfill and beans to
make a weighted sitting body, or use mostly plastic bean pellets for a more
relaxed, sleeping body.
Note: all seams are ¼ inch.
Plastic Doll Joints: The 16 inch doll body uses two 35mm plastic joints for the arms
and two 45mm joints for the legs. The 20 inch doll body uses two 45mm plastic
joints for the arms and two 55mm joints for the legs.
1. FRONTS. stitch fronts together, matching the notches.
2. BACKS. stitch backs together, matching the notches.
3. RUMP. stretch and stitch ¼” wide elastic along the back seam between the x’s.
This will wrinkle the rump.
4. CROTCH SEAM. gather-stitch the crotch at the bottom edge of the back piece
and pull threads to gather the fabric. The crotch front is not gathered.
5. Stitch crotch front to crotch back.
6. SIDE SEAMS. stitch side seams.
7. BIAS CASING. fold bias strip in half and stitch around neck to form casing for
cable tie.
8. PELLON. Place the iron-on pellon interfacing circles at positions indicated on
inside of body and iron them in place.
9. Iron the circles onto two of the arm pieces, (making sure the two arm pieces face
opposite directions rather than the same direction.) Clip a small hole in the center
of the pellon circle.
10. ASSEMBLE ARM. Stitch two arm pieces together, using one piece with the
pellon circle and one that does not have pellon.
11. TOPSTITCH. Before you attach the arm to the doll body, partially top stitch
the arm at the elbow. Start at the inside and top stitch half way across. Leave
enough of an opening to stuff the arm later on.
12. ATTACH THE ARM WITH THE JOINT...
- Slide the spoke piece of a doll joint into the arm and push the spoke out of
the hole in the pellon circle.
- Push the spoke into the corresponding pellon circle on the body. Make sure
that the arms curve toward the front of the body as they should.
- INSIDE THE DOLL BODY, slide the washer and locking piece on the spoke
and push the pieces together firmly.
- The joint should be tight enough to hold arm/leg positions but not so tight that
you can't turn the arms and legs.
13. REPEAT. Repeat for the other arm.
14. DARTS. Stitch the darts in the leg pieces. The upper leg has a dart that is
halfway across. The under-leg piece has a large dart all the way across the back of
the knee.
15. Stitch the darts at the top of the leg pieces, to form the hip curve.
16. LEG ASSEMBLY. Stitch the upper leg piece to the under leg piece: stitch
partway up one side and stop.
17. CASING. Fold the fabric back for the leg casing and stitch in place.
18. Finish stitching the leg pieces together, matching up the hip darts at the top.
19. REPEAT. Make the other cloth leg the same way.
20. PELLON. Iron a pellon circle on the cloth leg pieces where marked. Clip a
small hole in the center of the pellon circle. Turn the legs right side out.
21. JOINT. Slide the spoke piece of the plastic joint into the cloth leg, and push the
spoke through the hole in the pellon circle.
22. ATTACH LEG to BODY. Push the spoke piece into the corresponding position
on the cloth body. Make sure you don’t accidentally put the right leg on the left
side of the body or vice versa.
23. INSIDE THE DOLL BODY: Slide the large plastic washer onto the spoke
inside the doll body and then the locking piece. Push together firmly to lock the
joint in place.
24. TENSION. If the doll joints have a tendency to swing and not hold position,
then push the locking cap on tighter. You can also slide some small rubber bands
into the joint to make it more snug. I use the very small rubber bands that are
intended for hair.
25. CABLE TIES. Insert cable ties in the neck, arm and leg casings.
26. FINISHED. The body is ready for doll assembly.
PrillyCharmin’s Doll Body Patterns for Berenguer Dolls
PATTERNS C & D
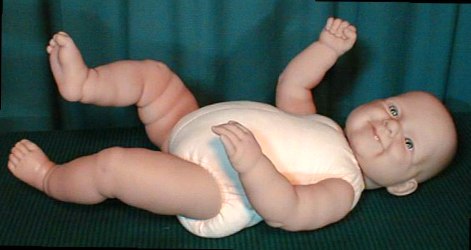
17" and 14" Lots to Love Fat Baby Doll Bodies
BODY ASSEMBLY
These two doll body styles are chubby and chunky. Arms, legs and head are
attached with narrow cable ties. The original vinyl doll body is used to create a
shoulder plate for the head to attach to. The rump is gathered. The bodies may be
stuffed firm with polyfill and beans to make a weighted sitting body, or use mostly
plastic bean pellets for a more relaxed, sleeping body.
Note: all seams are ¼ inch.
1. FRONTS. stitch fronts together, matching the notches.
2. BACKS. stitch backs together, matching the notches.
3. RUMP. stretch and stitch ¼” wide elastic along the back seam between the x’s.
This will wrinkle the rump.
4. SHOULDERS. stitch shoulders together matching front to back.
5. ARM CASINGS. fold bias strip in half and stitch to armholes to form casings for
cable ties.
6. NECK CASING. fold bias strip in half and stitch to neck to form casing for cable
tie.
7. SIDE SEAMS. stitch side seams
8. LEG CASINGS. fold bias strips in half and stitch to leg holes to form casings.
9. CROTCH SEAM. gather stitch the crotch at the bottom edge of the back piece
and pull threads to gather. The crotch front is not gathered.
10. stitch crotch front to crotch back.
11. CABLE TIES. Insert cable ties in the casings. Generally, you need one 14”
cable tie for the neck and four 8” cable ties for arms and legs.
12. FINISHED. Body is finished, and ready for doll assembly.
13. TENSION. When you insert the vinyl arms and legs, tighten the cable ties so
the arms and legs hold position but still allow the limbs to be positioned. If you
accidentally get the cable tie too tight, just remove it and try again with a new cable
tie. The easy way to clip the extra length off a cable tie is with a nail clipper.
PrillyCharmin’s Doll Body Patterns for Berenguer Dolls
PATTERN E
17" La Newborn Moments or La Newborn Doll Bodies
BODY ASSEMBLY
This doll body works with the Berenguer 17" La Newborn Moments or the La
Newborn dolls, which are very similar in size and configuration. Arms, legs, and
head are held on with narrow cable ties. The original vinyl doll body is used to
create a shoulder plate for the head to attach to. The rump is gathered. The body
may be stuffed firm with polyfill and beans to make a weighted sitting body, or use
mostly plastic bean pellets for a more relaxed, sleeping body.
Note: all seams are ¼ inch.
1. FRONTS. stitch fronts together, matching the notches.
2. BACKS. stitch backs together, matching the notches.
3. RUMP. stretch and stitch ¼” wide elastic along the back seam between the x’s.
This will wrinkle the rump.
4. SHOULDERS. stitch shoulders together matching front to back.
5. ARM CASINGS. fold bias strip in half and stitch to armholes to form casings for
cable ties.
6. NECK CASING. fold bias strip in half and stitch to neck to form casing for cable
tie.
7. SIDE SEAMS. stitch side seams
8. LEG CASINGS. fold bias strips in half and stitch to leg holes to form casings.
9. CROTCH SEAM. gather stitch the crotch at the bottom edge of the back piece
and pull threads to gather. The crotch front is not gathered.
10. stitch crotch front to crotch back.
11. CABLE TIES. Insert cable ties in the casings. Generally, you need one 14”
cable tie for the neck and four 8” cable ties for arms and legs.
12. FINISHED. Body is finished, and ready for doll assembly.
13. TENSION. When you insert the vinyl arms and legs, tighten the cable ties so
the arms and legs hold position but still allow the limbs to be positioned. If you
accidentally get the cable tie too tight, just remove it and try again with a new cable
tie. The easy way to clip the extra length off a cable tie is with a nail clipper.
© 2002 Cynthia A. Stevens and the EDDON Corporation. All rights reserved. This
pattern and instructions may not be reproduced for any reason, except by the
purchaser for the purpose of one personal backup copy. You may use this doll body
pattern to make and sell dolls, but you may not use this pattern to make and sell
the doll bodies alone. We reserve the exclusive right to make and sell doll bodies
using this pattern or to authorize person(s) to make and sell our doll bodies.
Berenguer Dolls are a trademark and copyright of JC Toys Inc. This pattern
product is not affiliated with JC Toys in any way.
PrillyCharmin’s doll bodies and patterns are available for purchase at PrillyCharmin's Doll shop, in the Patterns section.
|